Showing posts with label chocolate. Show all posts

Friday, 2 September 2016

Fudgy vegan brownies with a secret


I don't think there's a person on this earth who doesn't like brownies. Or if there is (and the reason isn't chocolate or histamin intolerance), there must be something wrong with them. Or well, I don't want to be mean, so I take it back. You're allowed to dislike brownies (and that means there's more for me!) But at least I love and adore them in all shapes and sizes. I'm also very picky when it comes to The Perfect Brownie. Dry baked goods suck and brownies make no exception to the rule. I'm also very interested in using my baked goods to smuggle all sorts of veggies to unsuspecting customers, muahaha.

I have a vaque recollection of doing a beetroot chocolate cake in the "good old" GlutenSugar days, at least I've had it on my agenda for a while. But now I decided to try it as the first treat I made for a wonderful café I've been baking for a bit over a month now, Lykke. They cater for all sorts of special diet people so I'm absolutely thrilled to be able to bake for them and practice my skills without having to eat everything myself.


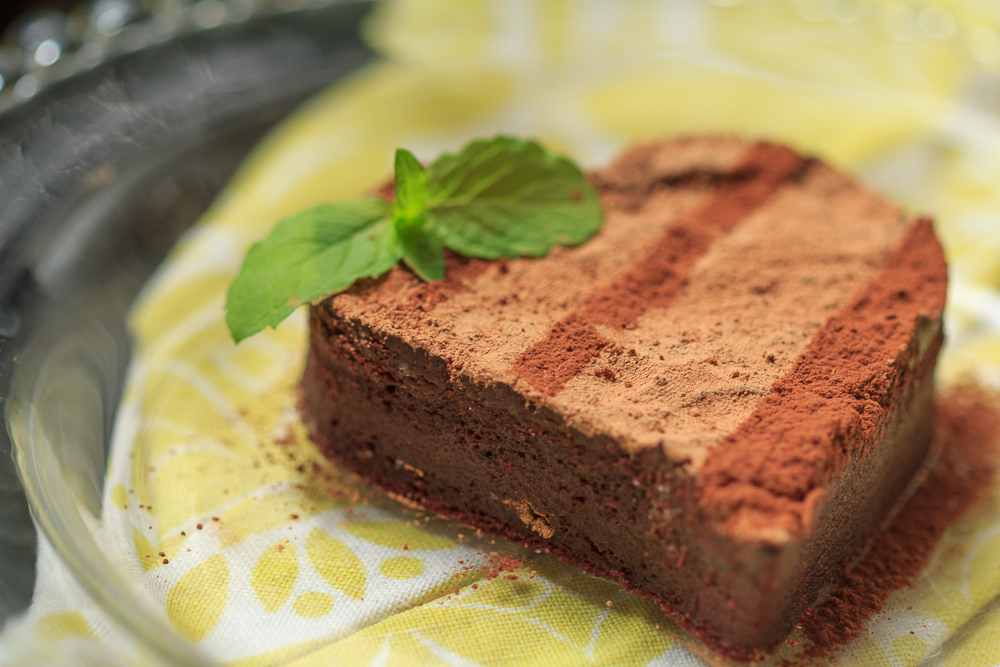
The recipe for these babies is from Unconventional baker, a wonderful blog for us who'd like our cakes without any conventional ingredients but still absolutely yummy. The first batch of the brownies that I fed to my girlfriends was a little too dense and smooth to my liking, plus the taste of beets was a bit too overpowering. And I managed to mess up the topping and it separated... It still tasted good but required a generous dusting with cocoa powder to make things photo worthy.

I changed things around a bit for the café version, replacing the beet boiling water with almond milk and adding chopped almonds into the batter for some texture. The result was much better, and it does say "fudgy brownies", not "fluffy brownies" in the recipe... They are dense, but super mega yummy, and I'll take a dense brownie against a dry one any day. Give them a go!


Fudgy beet brownies


Base

1/2 c wholemeal rice flour

6 tbsp sticky rice flour

1/4 c tapioca flour

1/4 tsp guar gum / xanthan gum

1/2 c cocoa powder

1 tsp cinnamon

1 tsp baking powder

1/2 tsp baking soda

1/4 tsp salt

1 c cooked beet puree

1 c maple syrup/other sweetener

1/2 c almond milk/other non-dairy milk (or beet water)

1 tbsp vanilla

chopped almonds/nuts


Topping

1 c non-dairy chocolate (chips or chopped block chocolate, preferably sugar free)

1/4 c margarine

(salt, if using unsalted margarine)

1/4 c almond milk/other non-dairy milk (or beet water)

(1/2 tsp amond extract, if you can get your hands on it. I couldn't)

cocoa powder for dusting


Heat oven to 175 C. Grease a 20 x 30 cm baking tray (or something roughly similar).

Make the beet puree first: plop beets into a kettle full of water and boil until soft. You can peel them before boiling of after, your call. Puree the boiled peets in a blender. Add a splash of beet boiling water to help things along, but don't thin out the puree too much, it needs to be nice and thick.

Mix flour, cocoa powder, baking soda, baking powder, cinnamon, and salt in a large mixing bowl. Add in all remaining base ingredients except chopped almonds and mix everything with a mixer to combine. Fold in chopped almonds. Pour into prepared baking pan and level the top with a spatula to smooth out the batter.

Bake for approximately 25 minutes until a skewer inserted in the center comes out dry(ish). Remove from oven and place on a cooling rack for 10 minutes.

In the meantime, prepare the chocolate topping by placing all ingredients in a glass or stainless steel bowl. Warm the mixture carefully on a double boiler and mix occasionally until everything is smooth and uniform. Once the brownie base has cooled a little, pour this mixture thinly and evenly over the brownies (use a spatula to spread it around evenly as needed). Allow the brownies to chill a little by placing them in the fridge for at least 20 minutes, once the tray has cooled enough to go in the fridge. This will allow the topping to get absorbed into the brownies, and that's when the magic happens.

Dust with some cocoa powder, cut into squares or hearts or dinosaurs or or or... and dig in :)

I knew I'd find a use to the dusting stencil I bought from Ikea way back when!


Sunday, 17 July 2016

Snickers bites


Everyone likes Snickers, right? At least I do. There's something magical about the scrumptious get-together of salty peanut, caramel and chocolate. The ingredients in the normal Snickers, though? Less magical.

So,  let's make a goodie version out of the teeth-jarringly sweet snack bar, shall we?

Syötävän hyvä beat me to it again. Or inspired me to get snickering in the first place, actually. I chose to take the "cover everything in double chocolate" route (because, why not?). And it was good and bad at the same time. Good, because more chocolate = more chocolate. Bad, because in this case, as I doubled the chocolate amount, I added way more sweetener than I should have. Also, the honey I was using was a spreadable type, not the runny one. So the chocolate became super thick. Yummy, but very very super honeylicious and thick.


I felt slightly sick after a few samples. to be honest ;). But what wouldn't I do for the sake of experimenting! Now I know. Next time: start easy on the honey. Or use maple syrup. Or coconut syrup.

I also decided to go for bite size goodies instead of full bars, since nobody could eat a whole bar of this stuff (or if they could, I'd very much like to see that). And I even halved the bites in the end. So these were more candies than bars in the end, but hey, more for everyone!

Next time I'd also like to get the chocolate a bit crunchier, which would probably mean less sweetener, more cacao butter. Something to think about, for the next time around.

I bought unroasted and unsalted peanuts, but ended up roasting and salting them :D. So, just buying the regular ones would probably have made more sense. But making stuff from scratch is also fun. At least I didn't grow the peanut trees (bushes? where do they grow?) myself :D


Snickers bites


Base

1 dl peanut butter

2 tbsp liquid sweetened (I chose maple syrup)

2 tbsp almond meal

(a dash of salt if using unsalted peanut butter)


Filling

8 soft dates, pitted

1 tbsp coconut oil

1 tbsp water

dash of vanilla powder

dash of salt

peanuts on the top (unroasted and unsalted or the normal ones)


Coating (for the double chocolatey way)

6 tbsp melted cacao butter (melt in a double boiler)

2-4 tbsp liquid sweetened (I used honey and 4 tbsp was way too much)

6 tbsp raw cacao powder

dash of vanilla powder


Line a freezer box/suitable container (ca. 10 x 20 cm) with baking paper. Mix the base ingredients. Spoon into the container and flatten out. Put in the freezer.

Mush the filling ingredients into a smooth paste with a hand mixer. Spoon on top of the base, spread out evenly. Press a desired amount of peanuts on top and stick in  the freezer for a couple of hours (or overnight).


Make the chocolate coating by mixing the ingredients together. Add sweetener if desired, but take heed from my mistake and start with a smaller amount. Lift the frozen snickers chunk out of the container using the baking paper. Cut into bars or bites. 

Dip bites in the chocolate and, ideally, lift onto a rack to drain. If, like me, you don't own a full set of praline making goodies which includes a fancy rack, just let a little of the excess chocolate drain back into the bowl and then set the bites on a plate and watch the excess choco melt into a charming little puddle around them.


Put back into the freezer and take out only as much as you're serving: the chocolate starts melting quite quickly. If you're particular about the look of the bites, you can cut out the excess chocolate from around the bites if you want them to resemble squares more than blobs. I tried my best, but since my chocolate was very thick, my bites remained adorably plump :).


Friday, 15 July 2016

Heavenly soft licorice chocolate truffles


Oh my Gods, my mouth starts watering when I even think about these wonderful little balls. I had some licorice powder left from the best licorice chocolate mudcake ever that I wanted to use for a light little snacky something. So, *Internet scour*, and ta-da: Syötävän hyvä delivers again. This one is actually not her recipe, but comes from the kitchen of the lovely Hannamari of Yellow mood. She's published a nifty little book about the ABCs of raw baking and these delicious treats are featured there.

So, without further ado, 1-2-3, bake! I added the ingredients into a blender, but the heat apparently did its thing, as all the mass was literally swimming in oil by the time I was done. I tried to massage it into the mass but it just wouldn't stick. So I poured the rest of it off and still the mass was the oiliest thing ever. I already thought I'd lost this round of the game, but I decided I'd let the freezer try to persuade the little beasties that were huddling together, not very keen to keep their ball shape.


So, a round of freezing and a round of reforming into balls the next day, and a round of rolling them in cacao powder. And, Oh My Sweet Soft Truffle Gods. The consistency was absolutely silky, the licorice flavour bursted into a dark symphony in the mouth after the initial tartness of chocolate powder, and I could have easily eaten the whole container full of the balls on one go. They only remained as balls in the fridge, though, and started to get soft the minute I got them out, but they were so absolutely wonderfully delicious that I couldn't have cared less. The mass was actually so pliable at this stage that I could have formed a bunch of licorice sculptures out of it, or little cups, or whatever people make out of Play Doh (I was never very talented with the stuff). I made a couple of hearts.


So, I was definitely not sorry that something weird happened with the blending process. Sometimes the almost-disastrous version turns out to be infinitely better than the one that was sought after. I might try to do these another time, just to see if I can get the "normal", not Play Doh type consistency to work. But if not, hey, there will be another round of something truly delicious to nibble on.


Silky soft licorice chocolate truffles

Recipe here on Syötävän hyvä


3 dl cashews

1 dl coconut oil, melted

3/4 dl honey/coconut nectar/maple syrup 

5 tbsp licorice (root) powder

3/4 tsp salt

Optional: contents of 5 medicinal coal capsules for black colour (I didn't use it)

Cacao powder/licorice powder for coating


Add all ingredients into a blender and blend until smooth. If you blend too long, it might be that the consistency turns into a ball of dough swimming in a pool of oil. If this happens, drain the excess oil. Form into small balls and stick into the freezer for ca. half an hour.

Original recipe had the truffles rolled in licorice powder, but since I ran out I used cacao, and boy was the match of chocolate and licorice heavenly! So, your choice: add either licorice powder or cacao on a plate and coat the balls in the powder. Store in the fridge, if there are any left after you're done with the game of "just a little taste more".


Sunday, 19 June 2016

Raw brownie bites


I was originally supposed to return from my Asia trip in July, but in the end the choice between one more month in Asia and a longer summer in Europe was an easy one. Especially Finland is amazing in the summer: there's nothing quite like the light summer nights, the rich and fresh smell of the forest after the rain and the possibility to spend some time at the summer house. Such peace and quiet is hard to find anywhere else.

Midnight

The cooking and baking facilities at the summer house are of course a bit more modest than in the city, so I came prepared: I blended some nuts already before we left and only planned to make something that needed minimal time in the kitchen and minimal amount of washing-up.

Raw brownies seemed like an excellent way to give some rich counterbalance to the fresh berries, salad and smoked fish we were having. And the dollop of sweet and creamy coconut whipped cream didn't exactly ruin the lovely little squares, either. Have I mentioned, how I'm a complete coconut junkie? Well, if I haven't then now you know. Hi, I'm Lilje, and I'm a coconut-holic. Give it to me in every form and consistency and I'll gobble it up like there's no tomorrow. In fact, I'm sipping coconut water as I write this post, and there's a new delicacy waiting to be blogged about in the fridge, where one of the main ingredients is coconut oil. But there are worse things to be hooked on than coconut, right? (Ok yes let's not mention chocolate in this context now, shall we?)

But I digress. Back to the brownies. They were really really good, and the yield of the recipe is perfect for a couple of days snacking for 2 people or a little sample for more people. I chose to make the brownies bite sized since they are quite rich, which was a good decision (and then you can have more pieces! Yay!) And the coconut cream really is a very nice addition, highly recommended.


The recipe is, surprise surprise, again from Syötävän hyvä. That girl is a powerhouse when it comes to amazing recipes and lovely food photography. Enjoy!


Raw brownies

(about 9 small squares)


Brownies

1 dl pecan nuts

a generous dl fresh, pitted dates

3 tbsp raw cacao powder

1 tbsp coconut oil, melted

a dash of salt


Topping

0,5 dl fresh, pitted dates

1 tbsp raw cacao powder

1 tbsp coconut oil, melted

ca. 2 tbsp water


Throw the nuts into a blender and blend till small but not yet powdery. Add dates, cacao powder and coconut oil and blend to a soft mass. I used a hand mixer, since I hate using blenders for date mixes (it just never works!). Also the hand mixer had a little hard time with the heavy mass, so if you have a small food processor attachment to your hand mixer, that might be the best option. Sweeten if desired, but the dates give ample sweetness in my opinion. Press the mass to the bottom of a rectangular/square dish.

Prepare the topping by mushing the ingredients together with a hand mixer. Add water till the consistency is spreadable-soft but not runny. Spread on top of the brownie mass. Put in the freezer until set (about an hour). Cut into cubes and store in the fridge. Serve with whipped coconut cream! 


Tuesday, 14 June 2016

Chickpea loves peanut butter and chocolate (cookies!)


When I cook, I usually don't make small portions. The same apparently applies to cooking chickpeas. I needed some for the sweet potato falafels and choc chip cookies, so I decided to cook enough to serve a small family. Which meant I had to come up with more ways to use them. Wait, did someone say "more cookies"?

I think I did. And this is what I made. I just bought some lovely Urtekram organic peanut butter, so these babies pack a really nutty punch. Which doesn't mean that they cannot be eaten by the handful. They can. And should.

My mom's poor hand mixer almost died a slow and painful death when trying to deal with the sticky dough, so my cookies still have some chunks of chickpeas in them. I recommend using a powerful food processor and/or thinning out the batter a little with water etc. These won't be as crunchy as the choc chip cookies I posted about before, but they're still pretty damn yummy!


Chickpeas meet peanut butter and chocolate and fall in love

makes 16 cookies

(original recipe here)


1 can / 3 dl cooked chickpeas

1/2 cup crunchy peanut butter

3 tbsp raw cacao powder

1/3 cup maple syrup

1 tbsp vanilla powder

1 tsp baking powder

1/4 tsp salt


Preheat your oven to 180ºC and line a baking tray with parchment paper.

Wash the chickpeas well and place all ingredients into a food processor. Blend for a minute, until ingredients are well combined and the dough is smooth and creamy.

Using a spoon, scoop the biscuits into balls and place onto the baking tray. Then press the biscuits down with your hands so they're fairly flat. Bake for 20-25 mins. Enjoy!


Monday, 13 June 2016

Ridiculously amazing chocolate licorice mudcake


Did someone just utter the three magic words of dessert awesome-landia? Chocolate? Check. Licorice? Check. Mudcake? Check. The minute I saw this recipe in Syötävän hyvä I knew it would be one of the first things I'd bake when I got into a decent kitchen again.

So, when my mom's partner's daughters and their kids were coming over for a short visit before heading up north, I didn't hesitate to pull out this recipe. And let me tell you: I wasn't let down. Rarely have I ever eaten anything so amazingly wonderfully rich and delicious. And I've sampled a lot of awesome things. This one: easily in the top 5 of amazement. Served with fresh strawberries and coconut cream, I just couldn't help going back to the fridge for more.


I'm going to let you in on a little secret word me and my ex coined, back in the day. In Finnish, it's "salasyöntilusikka". It doesn't translate directly, but it could be something like "secret snack spoon". Basically, it's a spoon stored in the fridge on the cake plate and used to dig away at the cake little by little until everything is gone (and no one is the wiser, since nothing has actually been served). Genious! This cake was definitely "salasyöntilusikka" worthy. And it also worked perfectly as a crumbled topping to the next delicacy I made, namely strawberry rhubarb ice cream. Which will be shared with you in the next post.

I baked the cake for 20 minutes and it didn't turn out quite as gooey and muddy as I would have liked. It wasn't dry by any means, not even on the edges, but I still prefer my mudcake even more gooey and saggy in the middle. So next time, this beauty will spend a little less time in the oven. Also a word of advice: not all licorice powders are created equal. Some are more bitter and licoricy than others. I used Urtekrams Licorice powder, and 3,5 tbsp gave just the right amount of licorice flavour. The original recipe had used only 3. So, if you like your cake to pack a more licorice-y punch, add more powder.

And seriously. This cake! Make it. And make it now. You won't regret it!


Awesome chocolate licorice mudcake

20 cm cake tin


200 g dark chocolate (the darker the better; I used 86% sweetened with normal sugar as the shop didn't carry anything "healhtier" (stevia/xylitol sweetened)

100 g butter

4 eggs

2 dl coconut sugar

1 tbsp potato flour or corn starch

3,5 tbsp licorice (root) powder

ca. 1/2 tsp salt


For the cake tin:

oil/butter

almond meal


Line the bottom of a spring form pan with parchment paper or use a normal cake tin (also lined with paper, so that you'll get the cake out of the tin). Butter the tin and sprinkle the sides and bottom with almond meal. You can skip this step if using a normal pan and lining it completely with parchment paper.

Melt chocolate and butter together on low heat and set aside to cool.

Separate egg whites from egg yolks. Whip the whites until a firm foam forms. Whip egg yolks and coconut sugar to a foam in a separate bowl.

Mix potato flour, licorice powder and salt and sift into yolk foam. Add chocolate-butter mix and mix to combine. Fold egg white foam last into the batter. The batter might look a bit curdled at some point (at least mine did) but it won't affect the flavour or consistency.

Bake in 180 degrees for about 20 minutes (a little less if you want your cake more gooey). The cake can remain a little wobbly in the middle when you take it out of the oven. Put in the fridge to set for at least 2 hours - the longer you leave the cake in the cold, the firmer it will be and easier to cut.

Decorate for example with whipped coconut cream (spiced with honey and vanilla) and fresh berries. Serve or eat straight from the fridge with the secret snack spoon. 


Chocolate chia pudding extravaganza


Chia puddings or overnight oats has been a blogger and foodie favourite for some time now. I'm only just getting into the thing, as my first test drives of the luxury breakfast were done in Thailand a couple of months back, inspired by Minimalist baker. Back then I served (or who am I kidding: ate. There was only me, devouring the whole thing) the pudding with fresh fruits. This time, as I was also making a chocolate cake for the day, I made my mom and me ridiculously wonderful breakfast treats out of the said chocolate chia pudding, whipped coconut cream, fresh strawberries and crushed nuts.

Yes, it was awesome. No, there isn't anything left. And yes, also the aforementioned cake is gone. But more about that beauty in the next post. But if you don't want to make a dessert-y breakfast thing, the pudding is also lovely by itself, although it does tend to get a bit lonely without at least some berries or fruit on top. Or granola.

The original recipe called for almond milk as the liquid, but I've made it with coconut milk (dilute with water if you don't want yours to be super rich) and this time, as I was running out of everything, I used a very interesting mixture of coconut water, yoghurt and the liquid left over from a coconut milk can when the solid white part has been scooped out to make coconut whipped cream. Not for the faint of heart!


Overnight chocolate chia pudding

(original recipe here)


1 1/2 cups (360 ml) almond milk / any veggie milk (coconut/cashew/hazelnut...)

1/3 cup chia seeds

1/4 cup cacao powder

2-5 tbsp maple syrup/honey 

1/2 tsp cinnamon

1/2 tsp sea salt

1/2 tsp vanilla powder/extract


Add all ingredients except sweetener to a mixing bowl and whisk to combine. Sweeten to taste.

 Let rest covered in the fridge overnight. Leftovers keep in the fridge for 2-3 days.

Serve chilled with desired toppings. 


Saturday, 30 April 2016

Chunky monkey madness

A person doesn't need a lot to be happy. This ice cream turned so amazing that there was an element of danger in the air as I couldn't help but lick the food processor blades that I used to make this awesomesauce treat. It makes no sense how divine a combination of frozen bananas and cacao powder can be! I wouldn't have needed any sweetener, but as I made the batch to be sold in the cafe I was working, I added some coconut syrup to make the punters happy. And the feedback hasn't been bad, let me tell you. I also testet adding some peanut butter in the mix which naturally didn't make things worse, but it was the normal kind with added sugar (since when living on an island, the pickings are sometime slim), so if you choose to use it, take one without sugar or make your own.

This treat works well as a soft serve, scooped into your mouth straight out of the mixing bowl, or frozen further into an ice-cream. You can also add some texture to the ice cream by adding some chopped nuts, cookie crumble, or whatever you may have on hand.

--------

Ei tartte ihminen paljoa tullakseen onnelliseksi. Tästä jätskistä tuli niin hyvää, että jo oli vaaran hetket käsillä kun en malttanut olla nuolematta monitoimikoneen teriä. Ei mitään järkeä, miten voi suklaan ja banaani kylmä yhdistelmä olla jumalaista. Ite en välttämättä ees tarttis makeutusta, mutta kun tämä meni myyntiin niin laitoin kuitenkin. Ei oo tullut huonoa palautetta, ei. Testailin sekä pähkinävoilla että ei, hyväähän se on siellä seassa mutta jos haluaa vältellä sokeria niin jättäkee pois. Toimii niin pehmiksenä tai oikeammaksi jätskiksi jäädytettynä. Sekaan oon heitellyt ekoissa versioissa kakkucrumblea josta en parin yrityksen jälkeenkään saanut crumblemaista koostumusta, joten ei siitä sen enempää. Sattumia on kiva olla, joten uudemmissa versioissa seassa on ollut siis em. pähkinävoita ja murskattuja pähkinöitä saatavuuden mukaan.


Chunky monkey

6 ripe bananas

5 tbsp cacao powder (unsweetened)

6 tbsp coconut milk

3-4 tbsp peanut butter

sweeten to taste (about 1-2 tbsp honey/coconyt syrup)

chopped nuts/cookie crumble for texture

Chop and freeze bananas. When they are frozen, add all ingredients (except chopped nuts/cookie crumble) in a food processor bowl and buzz till the consistency is smooth. Add sweetener if desired and buzz again. Mix in the chopped nuts/cookie crumble. Eat as soft serve or freeze.

-------

6 kypsää banaania

5 rkl kaakaojauhetta

6 rkl kookosmaitoa

3-4 rkl pähkinävoita

maun mukaan makeutusta (hunajaa/kookossiirappia), laitan yleensä n. 1-2 rkl)

pähkinämurua tai muita sattumia

Paloittele banaanit ja pakasta. Kun ovat kohmeisia, pistä kaikki yhdes koos blenderiin ja surauta pehmikseksi. Jos banaanit ehtii kovin jäisiksi, ne kannattaa lisätä erissä ettei blenderi kauhistu. Makeuta maun mukaan. Sekoita sekaan pähkinämurut. Syö sellaisenaan pehmiksenä tai pakasta jäätelöksi.


Vegan gluten free bliss brownies

I'm on Koh Phangan again, yay! And baking for and selling coffee in Art Cafe. These vegan brownies turned out to be a real hit. The recipe is taken from here with slight modifications. Works also well doubled. And baked in about 160 degrees... Can't be sure as the weird magic oven I'm using doesn't have any temperature markings, but the previous owner thought 160 was close to the truth so I believe her.

-------

Koh Phanganilla jälleen! Art Cafessa myynnissä tämän tytön tekemiä supermeheviä browneja. Gluteenitonta ja vegaania hyvyyttä, ah. Resepti täältä, modattu olosuhteisiin sopivaksi. Toimii myös tuplana. Ja n. 160 asteisessa uunissa paistettuna (tarkempaa havaintoa kyseisen taikauunin lämpötilasta ei ole, mutta edellinen omistaja arveli 160 olevan lähellä totuutta).


Ultimate Vegan Gluten free Brownies


3 tablespoons chia seeds + 9 tablespoons water

½ cup extra virgin olive oil (125 milliliters)


2 tablespoons peanut butter


1 cup coconut sugar, or a mixture of coconut sugar and brown sugar (200 grams)


½ cup unsweetened cocoa powder (50 grams)


¼ cup rice flour (40 grams)


¼ cup tapioca starch (potato starch in the original recipe) (40 grams)


¾ cup mixture of oat and buckwheat flour (brown rice flour in the original recipe) (105 grams)


½ cup pecans/cashews (walnuts in the original recipe) (60 grams)

Instructions
  1. Preheat the oven at  180 º C (works also with 160).
  2. Add the chia seeds and the water in a food processor, let sit for 10 min until a jelly forms. Add oil, peanut butter, sugars and blend. 
  3. Combine the dry ingredients in a bowl. Mix well.
  4. Combine the dry and wet ingredients and mix well, or process in food processor. Add then uts and stir.
  5. Pour the mixture in a baking pan with baking paper and bake at 180 º C for about 25 minutes or 160 around 30 mins.