Monday 27 June 2016

Gluten free crepes and summer berries


One of the ultimate summer treats in Finland are "lätyt" or, crepes. The sweet versions are usually served with berries and ice cream or whipped cream, or anything you fancy, really. They taste the best when made outdoors, on a huge cast-iron pan on wood fire, but they are equally yummy if made indoors on a normal skillet/pan.

As I avoid gluten whenever my willpower is enough to do so and today was one of those days, I wanted to have these delicacies in a gluten free form. They were so good (and there was still some filling left over, whaddayaknow!) so we made them twice. Savoury version with a paste made of smoked salmon, yoghurt and mayonnaise and the sweet (more photogenic!) version with berries, whipped coconut cream leftovers of the date caramel. It took a tremendous effort of willpower to actually get some photos out of these babies, as they are of course best eaten hot, straight out of the skillet. But I managed, yay!


The recipe was found from Gluteenitonta leivontaa. Enjoy! *would add a heart here, but Blogger thinks it's broken HTML. How depressing.*


Gluten free crepes

ca. 10 large ones

5 dl milk/almond milk (works well with either, probably also with coconut milk)

2 eggs

2 tbsp coconut sugar (can also be omitted)

1 tsp salt

3 dl gluten free flour (any kind)

2 tbsp butter, melted


butter/coconut oil for frying


Beat the eggs with a hand whish until the yolks and whites are combined into a uniform mix. Add milk, (sugar) and salt. Sift flour in, mixing constantly (gluten free flour tends to clump if added without sifting). Add melted butter last. Let the batter set for ca. 5 minutes. If it's super thick, add an egg and some milk. Fry on a hot skillet on each side. Serve with ice cream/whipped (coconut) cream and berries. And some bubbly to go with that isn't a bad idea ether. Eat at least one too many ;).


Sunday 19 June 2016

Raw brownie bites


I was originally supposed to return from my Asia trip in July, but in the end the choice between one more month in Asia and a longer summer in Europe was an easy one. Especially Finland is amazing in the summer: there's nothing quite like the light summer nights, the rich and fresh smell of the forest after the rain and the possibility to spend some time at the summer house. Such peace and quiet is hard to find anywhere else.

Midnight

The cooking and baking facilities at the summer house are of course a bit more modest than in the city, so I came prepared: I blended some nuts already before we left and only planned to make something that needed minimal time in the kitchen and minimal amount of washing-up.

Raw brownies seemed like an excellent way to give some rich counterbalance to the fresh berries, salad and smoked fish we were having. And the dollop of sweet and creamy coconut whipped cream didn't exactly ruin the lovely little squares, either. Have I mentioned, how I'm a complete coconut junkie? Well, if I haven't then now you know. Hi, I'm Lilje, and I'm a coconut-holic. Give it to me in every form and consistency and I'll gobble it up like there's no tomorrow. In fact, I'm sipping coconut water as I write this post, and there's a new delicacy waiting to be blogged about in the fridge, where one of the main ingredients is coconut oil. But there are worse things to be hooked on than coconut, right? (Ok yes let's not mention chocolate in this context now, shall we?)

But I digress. Back to the brownies. They were really really good, and the yield of the recipe is perfect for a couple of days snacking for 2 people or a little sample for more people. I chose to make the brownies bite sized since they are quite rich, which was a good decision (and then you can have more pieces! Yay!) And the coconut cream really is a very nice addition, highly recommended.


The recipe is, surprise surprise, again from Syötävän hyvä. That girl is a powerhouse when it comes to amazing recipes and lovely food photography. Enjoy!


Raw brownies

(about 9 small squares)


Brownies

1 dl pecan nuts

a generous dl fresh, pitted dates

3 tbsp raw cacao powder

1 tbsp coconut oil, melted

a dash of salt


Topping

0,5 dl fresh, pitted dates

1 tbsp raw cacao powder

1 tbsp coconut oil, melted

ca. 2 tbsp water


Throw the nuts into a blender and blend till small but not yet powdery. Add dates, cacao powder and coconut oil and blend to a soft mass. I used a hand mixer, since I hate using blenders for date mixes (it just never works!). Also the hand mixer had a little hard time with the heavy mass, so if you have a small food processor attachment to your hand mixer, that might be the best option. Sweeten if desired, but the dates give ample sweetness in my opinion. Press the mass to the bottom of a rectangular/square dish.

Prepare the topping by mushing the ingredients together with a hand mixer. Add water till the consistency is spreadable-soft but not runny. Spread on top of the brownie mass. Put in the freezer until set (about an hour). Cut into cubes and store in the fridge. Serve with whipped coconut cream! 


Tuesday 14 June 2016

Chickpea loves peanut butter and chocolate (cookies!)


When I cook, I usually don't make small portions. The same apparently applies to cooking chickpeas. I needed some for the sweet potato falafels and choc chip cookies, so I decided to cook enough to serve a small family. Which meant I had to come up with more ways to use them. Wait, did someone say "more cookies"?

I think I did. And this is what I made. I just bought some lovely Urtekram organic peanut butter, so these babies pack a really nutty punch. Which doesn't mean that they cannot be eaten by the handful. They can. And should.

My mom's poor hand mixer almost died a slow and painful death when trying to deal with the sticky dough, so my cookies still have some chunks of chickpeas in them. I recommend using a powerful food processor and/or thinning out the batter a little with water etc. These won't be as crunchy as the choc chip cookies I posted about before, but they're still pretty damn yummy!


Chickpeas meet peanut butter and chocolate and fall in love

makes 16 cookies

(original recipe here)


1 can / 3 dl cooked chickpeas

1/2 cup crunchy peanut butter

3 tbsp raw cacao powder

1/3 cup maple syrup

1 tbsp vanilla powder

1 tsp baking powder

1/4 tsp salt


Preheat your oven to 180ºC and line a baking tray with parchment paper.

Wash the chickpeas well and place all ingredients into a food processor. Blend for a minute, until ingredients are well combined and the dough is smooth and creamy.

Using a spoon, scoop the biscuits into balls and place onto the baking tray. Then press the biscuits down with your hands so they're fairly flat. Bake for 20-25 mins. Enjoy!


Monday 13 June 2016

Strawberry rhubarb N'ice cream


Two of my favourite bloggers, the lovely ladies behind Tuulia and Vanelja, have written this summer's tastiest and prettiest cookbook: N'Ice cream / Hyvän olon jäätelökirja. The book is ooze full of amazing ice cream recipes, free of dairy, gluten and refined sugar. Ice cream that not only looks picture perfect but makes you feel good as well. What's not to love? I already got the book as an e-book and used it as an inspiration for my Monkey madness ice cream, but of course I had to get the hard copy as well, because it's insanely beautiful.

As a lucky coincidence (no coercion on my part, I swear!), mom just got a brand new blender, so it was only a matter of time when the first "real" batch of ice cream got made. And since it's me we're talking about here, it didn't take long at all. The only difficulty was to choose which one of the wonderful recipesgot tested first. That was a hard one! But since we already got some rhubarb stalks for a pie we took as a gift for my grandma, the choice was kinda done for me. Strawberry rhubarb for the win!


And oh boy, how good it turned out. I added a deciliter more strawberries than the original recipe, since I wanted a more intense strawberry flavour. Mom doesn't have an ice cream maker (and neither do I, although that problem will be solved the minute I get back home), so I made the ice cream with the "manual churning method", which means stirring the ice-cream-to-be every 30 minutes. I think my mixture was way runnier than the one in the book, for after 3 hours when the ice cream should have been done (according to the book) I was still left with a chilled strawberry soup. Then the night came, and froze the thing solid, undoing all my vigorous stirring efforts of the previous night. Oh well. The taste was still delicious, although the texture would have been much better when done in an ice cream maker, I'm sure.

But it still made some pretty decent photos. Some of these are my all-time food photo favourites. Thanks, mom, for the wonderful plates and glasses! It's always so inspiring to shoot food in somebody else's kitchen :)

The ice cream is amazing by itself, and even more amazing with whipped coconut cream and pieces of this heavenly chocolate licorice cake. And the mint leaves add a perfect end note to it all. A sweet, heavenly, good-for-you melt-in-your-mouth dessert sundae. Ah, bliss...<3 p="">


Strawberry rhubarb ice cream


1 large rhubarb stalk

3,5 dl fresh strawberries (plus some more to serve)

 1 can (400 ml) full fat coconut milk, chilled in the fridge overnight

1 tbsp cashew butter (I subbed with peanut butter)

1 tbsp coconut oil

3-5 tbsp organic honey (I used a mix of honey and maple syrup, I think 5 tbsp all together)

1/2 tsp vanilla powder/extract


Rinse the rhubarb and peel if you'd like. Chop into small pieces. Rinse strawberries and remove cores. Scoop the solid white part of the coconut milk into a blender. Add rhubarb, cashew butter, coconut oil, sweetener, vanilla and about 2,5 dl of the strawberries. Blend until the consistency is nice and creamy. Add sweetener if necessary.

If you have an ice cream maker: Add the mixture into the machine and make into ice cream according to the machine instructions. Chop the remaining strawberries into small pieces and add into the ice cream shortly before it's done.

If you don't have an ice cream maker: Chop the remaining strawberries into small pieces and add into the mixture. Pour into a freezer-proof tin. Freeze until done, mixing every 30 minutes or so. 


Ridiculously amazing chocolate licorice mudcake


Did someone just utter the three magic words of dessert awesome-landia? Chocolate? Check. Licorice? Check. Mudcake? Check. The minute I saw this recipe in Syötävän hyvä I knew it would be one of the first things I'd bake when I got into a decent kitchen again.

So, when my mom's partner's daughters and their kids were coming over for a short visit before heading up north, I didn't hesitate to pull out this recipe. And let me tell you: I wasn't let down. Rarely have I ever eaten anything so amazingly wonderfully rich and delicious. And I've sampled a lot of awesome things. This one: easily in the top 5 of amazement. Served with fresh strawberries and coconut cream, I just couldn't help going back to the fridge for more.


I'm going to let you in on a little secret word me and my ex coined, back in the day. In Finnish, it's "salasyöntilusikka". It doesn't translate directly, but it could be something like "secret snack spoon". Basically, it's a spoon stored in the fridge on the cake plate and used to dig away at the cake little by little until everything is gone (and no one is the wiser, since nothing has actually been served). Genious! This cake was definitely "salasyöntilusikka" worthy. And it also worked perfectly as a crumbled topping to the next delicacy I made, namely strawberry rhubarb ice cream. Which will be shared with you in the next post.

I baked the cake for 20 minutes and it didn't turn out quite as gooey and muddy as I would have liked. It wasn't dry by any means, not even on the edges, but I still prefer my mudcake even more gooey and saggy in the middle. So next time, this beauty will spend a little less time in the oven. Also a word of advice: not all licorice powders are created equal. Some are more bitter and licoricy than others. I used Urtekrams Licorice powder, and 3,5 tbsp gave just the right amount of licorice flavour. The original recipe had used only 3. So, if you like your cake to pack a more licorice-y punch, add more powder.

And seriously. This cake! Make it. And make it now. You won't regret it!


Awesome chocolate licorice mudcake

20 cm cake tin


200 g dark chocolate (the darker the better; I used 86% sweetened with normal sugar as the shop didn't carry anything "healhtier" (stevia/xylitol sweetened)

100 g butter

4 eggs

2 dl coconut sugar

1 tbsp potato flour or corn starch

3,5 tbsp licorice (root) powder

ca. 1/2 tsp salt


For the cake tin:

oil/butter

almond meal


Line the bottom of a spring form pan with parchment paper or use a normal cake tin (also lined with paper, so that you'll get the cake out of the tin). Butter the tin and sprinkle the sides and bottom with almond meal. You can skip this step if using a normal pan and lining it completely with parchment paper.

Melt chocolate and butter together on low heat and set aside to cool.

Separate egg whites from egg yolks. Whip the whites until a firm foam forms. Whip egg yolks and coconut sugar to a foam in a separate bowl.

Mix potato flour, licorice powder and salt and sift into yolk foam. Add chocolate-butter mix and mix to combine. Fold egg white foam last into the batter. The batter might look a bit curdled at some point (at least mine did) but it won't affect the flavour or consistency.

Bake in 180 degrees for about 20 minutes (a little less if you want your cake more gooey). The cake can remain a little wobbly in the middle when you take it out of the oven. Put in the fridge to set for at least 2 hours - the longer you leave the cake in the cold, the firmer it will be and easier to cut.

Decorate for example with whipped coconut cream (spiced with honey and vanilla) and fresh berries. Serve or eat straight from the fridge with the secret snack spoon. 


Chocolate chia pudding extravaganza


Chia puddings or overnight oats has been a blogger and foodie favourite for some time now. I'm only just getting into the thing, as my first test drives of the luxury breakfast were done in Thailand a couple of months back, inspired by Minimalist baker. Back then I served (or who am I kidding: ate. There was only me, devouring the whole thing) the pudding with fresh fruits. This time, as I was also making a chocolate cake for the day, I made my mom and me ridiculously wonderful breakfast treats out of the said chocolate chia pudding, whipped coconut cream, fresh strawberries and crushed nuts.

Yes, it was awesome. No, there isn't anything left. And yes, also the aforementioned cake is gone. But more about that beauty in the next post. But if you don't want to make a dessert-y breakfast thing, the pudding is also lovely by itself, although it does tend to get a bit lonely without at least some berries or fruit on top. Or granola.

The original recipe called for almond milk as the liquid, but I've made it with coconut milk (dilute with water if you don't want yours to be super rich) and this time, as I was running out of everything, I used a very interesting mixture of coconut water, yoghurt and the liquid left over from a coconut milk can when the solid white part has been scooped out to make coconut whipped cream. Not for the faint of heart!


Overnight chocolate chia pudding

(original recipe here)


1 1/2 cups (360 ml) almond milk / any veggie milk (coconut/cashew/hazelnut...)

1/3 cup chia seeds

1/4 cup cacao powder

2-5 tbsp maple syrup/honey 

1/2 tsp cinnamon

1/2 tsp sea salt

1/2 tsp vanilla powder/extract


Add all ingredients except sweetener to a mixing bowl and whisk to combine. Sweeten to taste.

 Let rest covered in the fridge overnight. Leftovers keep in the fridge for 2-3 days.

Serve chilled with desired toppings. 


Sweet potatoes meet avocado pea mash, feta and eggs


After going gluten free I've rarely had anything toasted. This recipe from Tuulia was originally called "sweet potato toast", which made me quite excited. A toast with lots of super yummy toppings, in this case, feta cheese, a light and fresh puree out of avocados and peas plus runny, gooey eggs sounded like heaven to me. So I got to work. And wonderful it was, indeed! The toast aspect didn't really come across, though, but I still almost licked the plate. So no harm done. Just out of principle, though, I'm not going to call these "toast". Like I refuse to call stuff piled on a salad "a hamburger". Anyhow, these babies are delish as breakfast, lunch or dinner. Or a snack. Probably not as dessert. Or maybe, with some caramel sauce?

As I am queen of "more toppings and sauce than the actual main ingredient, please", you can't really see the poor sweet potato slices, hiding under the pile of yumminess. But rest assured, it is there. And it is delicious!

The original recipe didn't add salt on the sweet potatoes while roasting them, but if I were to do this recipe a second time (which I probably will, as it was really really yum) I'd add salt. And maybe some mint to the puree/mash. Just as a tip!


Sweet potato slices, avocado pea mash, feta and eggs

serves 4
1-2 sweet potatoes
2-3 tbsp olive oil
a few handfuls of baby spinach (or other leafy greens)
Avocado Pea Mash, for serving
sheep feta cheese, crumbled
4 organic eggs
salt & black pepper
fresh herbs or sprouts


Avocado pea mash

1 big ripe avocado
1 1/2 cups / 200g fresh or thawed peas
1/2 lemon, juiced
3 tbsp olive oil
salt & black pepper
a bit of water, if needed
(optional: some mint leaves)


Preheat the oven to 200 C°. Wash the sweet potato thoroughly, peel if you're so inclined and cut it into about 2 cm slices lengthwise. Cover a baking tray with parchment paper and place the sweet potatoes on the baking tray. Sprinkle with olive oil (and salt). Bake for about 15-20 minutes, until the sweet potatoes are soft. Prepare the avocado pea mash and the eggs in the meantime.
Add all the avocado pea mash ingredients to a blender (or use a hand mixer) and pulse/mix until relatively smooth with some bits left. Add a bit of water, if needed. Add salt and black pepper to taste.
Boil the eggs for about 4 to 5 minutes, so that the yolk remains runny. 
When the sweet potatoes potatoes are ready, remove them from the oven. Place the slices on plates and top with spinach, avocado pea mash, crumbled feta cheese and the eggs. Sprinkle some fresh herbs on top too. Serve straight away and enjoy!


Sunday 12 June 2016

Chickpea choc chip cookies


I think you were promised a sweet treat. Well, wait no longer, my sweet-toothed little munchkins. Here's something for you that's sweet and good for you at the same time!

Chick peas (or garbanzo beans) are one of my favourite legume sorts. You can roast them, mush them, mangle them or do whatever, and they still don't complain and taste delish. You can apparently also magic sweet treats out of them, like this recipe proves. Verily amazing!

My version tasted quite orangey, since I used an orange dark chocolate. I imagine these would be equally good with a plain one. Or a mint one? Yum!

And yeah, they are vegan. Not that they need to be, for my kitchen, but hey, if that's the way you roll, then these are complete good for you, too! Inspiration this time was the lovely Detoxinista. Hey, already in English! Whaddayaknow. Less translation needed.


Chickpea chocolate chip cookies

(original recipe here)

makes 16 cookies


1 1/2 cups cooked chickpeas

1/2 cup gluten free oat flour

3/4 cup coconut sugar

3 tbsp melted coconut oil

1 tbsp vanilla extract (or vanilla powder)

1/2 tsp salt

1/2 tsp baking soda

1 tsp apple cider vinegar

3/4 cup dark chocolate chips

*Note: You can make your own flour by simply grinding gluten-free rolled oats in a food processor or coffee grinder until a fine flour is created. 
Preheat the oven to 175 degrees and line a baking sheet with parchment paper. Process the chickpeas, coconut oil and vanilla in a food processor until relatively smooth. You can also use a stand mixer. Add in the coconut sugar, flour, salt, baking soda and vinegar and blend or mix until until a smooth batter is formed. Or not so smooth, if you're using a rather low-power stand mixer like me. You might need to add more oil in that case. I did.

Add in the chocolate chips and pulse/mix briefly. Drop the dough by heaping tablespoons onto a lined baking sheet and use wet fingers to gently flatten the cookies (they won’t spread on their own.) Bake until the tops begin to crack and the edges are dry to the touch, about 18 to 20 minutes. Cool completely (or as long as you can wait) on a rack before serving.


Pistachio crusted salmon with fresh take on coleslaw


And there's more! The crowd goes wild! A whole onslaught of posts is coming your way, as you may or may not have noticed. And they're all amazing. The food, I mean. And the posts are pretty nice too ;)

 Here's another main dish, fresh from mom's kitchen (made by yours truly, of course). If there's something I've been craving protein-wise while I was travelling, it is definitely fish. The fish in Finland is so good and plentiful, that we've been having it for almost every meal since my return. The fresh water fishes are super yummy, but salmon is still my all-time favourite. The traditional way of preparing it (at least in our kitchen) has to do with smothering the poor thing in sour cream and/or cheese, which makes the dish rather heavy. So, when I saw this take on a traditional fish dish on Syötävän hyvä, I jumped at the chance. Pistachios and salmon! Oh boy, that cannot be bad. And it wasn't, let me tell you. Especially with the super fresh side of kohlrabi, apple and carrot.

A plateful of awesomeness that doesn't leave you sluggish or bloated afterwards. What more can a girl ask for?

(Well, some sweet treats. But there will be a post very soon on that front. Stay tuned!)

So, drumroll, please: Mr. Salmon meets Miss Slaw. A match made in heaven!


Pistachio salmon meets kohlrabi apple slaw

(original recipe here, in Finnish)

Part 1: Mr. Salmon


300–400 g salmon fillet

ca. 1 dl pistachio nuts (ca. 250 g salted and roasted pistachios in the shell) 

1–2 tbsp Dijon mustard

chives

parsley

salt + pepper


Peel and chop nuts. If you're using ready-shelled nuts, check if they're already salted. If not, roast on a pan and salt. Crush nuts. Mix with mustard and a generous helping of chopped chives and parsley. 

Cut the salmon into portion sized pieces. Line baking sheet with baking paper, place salmon pieces skin-down on the paper. Sprinkle salt (can be quite a lot) and pepper (a little less) on the fish. Cover with the pistachio-mustard-mush. 

Bake in 200 degrees for about 10 minutes, depending on the thickness of the fish bits. Don't overbake! Nobody likes dry fish...


Part 2: Miss Slaw


1 part kohlrabi

1 part green apple

0,5 part carrot (just for the colour splash, you know)

a little mayonnaise

a little olive oil

small squeeze of lemon

salt + pepper to taste


Grate kohlrabi, apple and carrot. Mix with the rest of the ingredients. Introduce to Mr. Salmon.


Sweet potato falafels and quinoa tabbouleh


 Dinner is served! I've been almost deliriously happy to be puttering away in my mom's lovely kitchen after my travels. The first week has seen a couple of main dishes, lots of healthy sweet treats and breakfast aweomeness. After the ashram diet I've put on a few kilos already, but boy has it been worth it :D

The Finnish summer decided to play its trump card and drop the temperatures below 10 degrees and accompany the freeze with rain and wind. Thanks! But I don't really mind, Finland is still Finland: the air is clear and clean which makes a change after the dusty Kathmandu and everything is super green and lush after the rains and the wonderful spell of warm summer weather that just conveniently ended before my arrival. Any my mom's excited that she doesn't have to do the cooking, for once!

So, let's get to it, shall we? This time I have a main dish for you. Or actually two, combined into one delicious meal. These recipe is from one of my favourite blogs, Feelgood Kitchen. And even though the blog is in Finnish, fear not, English speakers! I have translated them for you, so that you can enjoy recreating the yumminess, if you so choose.

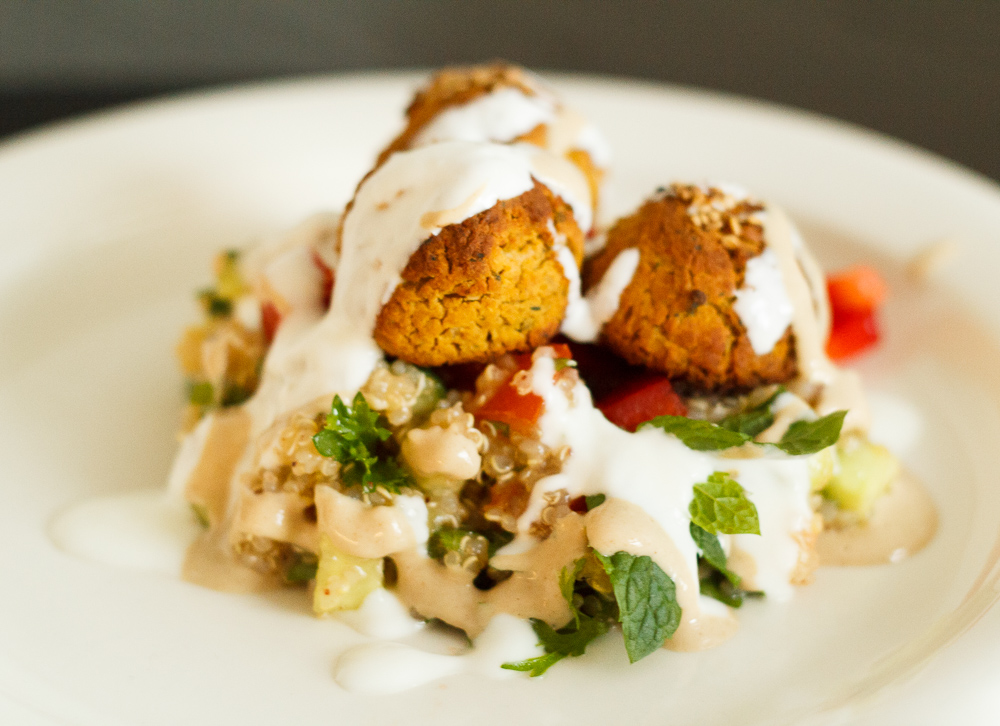
Without further ado: sweet potato falafels and a fresh, lovely gluten free alternative for the middle eastern staple, tabbouleh. The falafels were a bit on the dry side for my liking, so next time I'd add some more moisture to the mix. The baking time was also a little longish for my oven, so I recommend keeping an eye on the things while they're baking away, so that they don't get even drier or burn. The original recipes for both the falafels and tabbouleh are doubled, and my ratio of sweet potato / chickpea might have also been a bit off, but the falafels were good anyway, especially with the light and fresh tabbouleh.

The tahini sauce might have worked better with a lighter tahini; mine was an organic and quite flavourful. I also can't take quite as much raw garlic as was called for in the recipe and only used one clove. The sauce turned quite pungent, so I took the liberty of softening it a bit with maple syrup. I also served yoghurt as a second sauce, and I think it was a very welcome addition.


Sweet potato falafels

(original recipe here, in Finnish)

makes ca. 20 small falafels


smallish sweet potato (ca. 300-400 g)

1 can chickpeas / 3 dl soaked and cooked ones

1,5 tbsp tahini

2 cloves of garlic

1 onion

0,5 dl chickpea flour

couple of handfuls of fresh coriander

1,5 tsp cumin

0,5 tsp chili powder

a fair amount of salt

black pepper

on the surface: olive olil & sesame seeds


Prepare the sweet potato in the microwave oven: wash it, stab it a couple of times with a fork and wrap in slightly damp kitchen roll. Stick in the microwave on a microwave proof plate, nuke for 3 min. Flip the sweet potato around, nuke another 3 min until soft. If you don't have a microwave, chop the sweetie , drizzle with olive oil and roast in 200 degrees until soft. Let the sweet potato cool down a bit.

Add all inredients (not the chickpea flour!) in a food processor and blend into a doughy paste (it doesn't have to be smooth). You can also use a stand mixer. Check the flavour and add spices, if needed. Mix the chickpea flour to the dough in the end.

Heat the oven till 225 degrees. Roll the dough into small balls with moist hands, set on a baking sheet. Drizzle with olive oil and sprinkle with sesame seeds, if you'd like. Bake for 35 minutes (too much in my oven) or until the falafels are a nice golden colour.


Lemon tahini sauce

1 dl tahini

0,75 dl water

3 tbsp lemon juice

1 tbsp olive oil

1 clove of garlic, crushed

a sprinkle of salt and black pepper to taste


Mix all ingredients. Add water until the consistency is to your liking. The sauce will keep in the fridge for a couple of days.


Quinoa tabbouleh

(original recipe here, in Finnish)

2 dl cooked quinoa 

1/2 small cucumber

2 tomatoes

1/2 bell pepper

a small handful of fresh parsley

a small handful of fresh mint and coriander

0,5 tsp salt

0,25 tsp cinnamon (I added more as I'm a cinnamon junkie)

1,5 tbsp olive oil

1,5 tbsp lemon juice

Dice the veggies and chop the herbs. Let the tomatoes sit on a couple of sheets of kitchen roll for a bit so that they don't make the tabbouleh soggy. Mix quinoa with spices, olive oil and lemon juice. (Pro tip! I like to cook my quinoa with lemon juice and soy sauce/tamari. If you follow my lead, then you can reduce the amount of lemon juice in the recipe. Try what suits your taste buds the best!) Add diced veggies and chopped herbs. Mix and enjoy!

The tabbouleh was even more delicious the next day, as the cinnamon popped up way more then. Super omnom!


Wednesday 8 June 2016

Transformation and kick-ass granola

So, I'm back from my trip to Asia. The last weeks were mainly spent drooling in various food blogs and thinking about changing the name and language of my blog to better reflect the new me who's behind the screen now. And voilá: from the ashes of Pata ja Kattila, Delicananda was born! Recipes and musings about food in English, experiments in the kitchen, tales of travels and all that jazz. Welcome!

After landing in Finland and getting to my mom's recently redone kitchen I was almost delirious with happines. I get to cook and bake again! Yipypiyippeeee! So, without further ado or adon't, let's get to it. The first thing I made and the first recipe of the new and improved blog I'm sharing with you is... *drumroll, please* A BREAKFAST GRANOLA! The inspiration is from one of my favourite blogs ever, Syötävän hyvä, namely these two posts. I've never made granola myself before, so now was the high time. And it turned out awesome!


The marriage of delicious nuts, seeds and flakes, roasted in the oven into crunchy perfection. Just try it! Plain out of the jar a a snack or sprinkled into your favourite type of yoghurt. These would also work wonders in a chia pudding or a topping for an ice cream. The possibilities are endless!


Crunchy granola


0,5 dl buckwheat flakes

0,5 dl millet flakes (can be subbed with oat/quinoa...)

2 dl nut mix (e.g. cashews, almonds, brazil nuts, pecans...)

0,5 - 1 dl seed mix (I used peeled hemp seeds, sunflower seeds and pumpkin seeds)

3 tbsp coconut oil

2 tbsp maple syrup

1 tbsp cinnamon

1 egg white


Combine the dry ingredients in a bowl. Add wet ingredients and mix until you get an evenly distributed, sticky looking mixture. Spread out on a baking sheet lined with baking paper and roast in 175 degrees for about 20 minutes, or until the nuts have started to get a little colour and the texture is getting crunchier. Mix a couple of times during the roasting. Cool and store in an airtight container. Use in every way imaginable!