Sunday, 12 June 2016

Chickpea choc chip cookies


I think you were promised a sweet treat. Well, wait no longer, my sweet-toothed little munchkins. Here's something for you that's sweet and good for you at the same time!

Chick peas (or garbanzo beans) are one of my favourite legume sorts. You can roast them, mush them, mangle them or do whatever, and they still don't complain and taste delish. You can apparently also magic sweet treats out of them, like this recipe proves. Verily amazing!

My version tasted quite orangey, since I used an orange dark chocolate. I imagine these would be equally good with a plain one. Or a mint one? Yum!

And yeah, they are vegan. Not that they need to be, for my kitchen, but hey, if that's the way you roll, then these are complete good for you, too! Inspiration this time was the lovely Detoxinista. Hey, already in English! Whaddayaknow. Less translation needed.


Chickpea chocolate chip cookies

(original recipe here)

makes 16 cookies


1 1/2 cups cooked chickpeas

1/2 cup gluten free oat flour

3/4 cup coconut sugar

3 tbsp melted coconut oil

1 tbsp vanilla extract (or vanilla powder)

1/2 tsp salt

1/2 tsp baking soda

1 tsp apple cider vinegar

3/4 cup dark chocolate chips

*Note: You can make your own flour by simply grinding gluten-free rolled oats in a food processor or coffee grinder until a fine flour is created. 
Preheat the oven to 175 degrees and line a baking sheet with parchment paper. Process the chickpeas, coconut oil and vanilla in a food processor until relatively smooth. You can also use a stand mixer. Add in the coconut sugar, flour, salt, baking soda and vinegar and blend or mix until until a smooth batter is formed. Or not so smooth, if you're using a rather low-power stand mixer like me. You might need to add more oil in that case. I did.

Add in the chocolate chips and pulse/mix briefly. Drop the dough by heaping tablespoons onto a lined baking sheet and use wet fingers to gently flatten the cookies (they won’t spread on their own.) Bake until the tops begin to crack and the edges are dry to the touch, about 18 to 20 minutes. Cool completely (or as long as you can wait) on a rack before serving.


Pistachio crusted salmon with fresh take on coleslaw


And there's more! The crowd goes wild! A whole onslaught of posts is coming your way, as you may or may not have noticed. And they're all amazing. The food, I mean. And the posts are pretty nice too ;)

 Here's another main dish, fresh from mom's kitchen (made by yours truly, of course). If there's something I've been craving protein-wise while I was travelling, it is definitely fish. The fish in Finland is so good and plentiful, that we've been having it for almost every meal since my return. The fresh water fishes are super yummy, but salmon is still my all-time favourite. The traditional way of preparing it (at least in our kitchen) has to do with smothering the poor thing in sour cream and/or cheese, which makes the dish rather heavy. So, when I saw this take on a traditional fish dish on Syötävän hyvä, I jumped at the chance. Pistachios and salmon! Oh boy, that cannot be bad. And it wasn't, let me tell you. Especially with the super fresh side of kohlrabi, apple and carrot.

A plateful of awesomeness that doesn't leave you sluggish or bloated afterwards. What more can a girl ask for?

(Well, some sweet treats. But there will be a post very soon on that front. Stay tuned!)

So, drumroll, please: Mr. Salmon meets Miss Slaw. A match made in heaven!


Pistachio salmon meets kohlrabi apple slaw

(original recipe here, in Finnish)

Part 1: Mr. Salmon


300–400 g salmon fillet

ca. 1 dl pistachio nuts (ca. 250 g salted and roasted pistachios in the shell) 

1–2 tbsp Dijon mustard

chives

parsley

salt + pepper


Peel and chop nuts. If you're using ready-shelled nuts, check if they're already salted. If not, roast on a pan and salt. Crush nuts. Mix with mustard and a generous helping of chopped chives and parsley. 

Cut the salmon into portion sized pieces. Line baking sheet with baking paper, place salmon pieces skin-down on the paper. Sprinkle salt (can be quite a lot) and pepper (a little less) on the fish. Cover with the pistachio-mustard-mush. 

Bake in 200 degrees for about 10 minutes, depending on the thickness of the fish bits. Don't overbake! Nobody likes dry fish...


Part 2: Miss Slaw


1 part kohlrabi

1 part green apple

0,5 part carrot (just for the colour splash, you know)

a little mayonnaise

a little olive oil

small squeeze of lemon

salt + pepper to taste


Grate kohlrabi, apple and carrot. Mix with the rest of the ingredients. Introduce to Mr. Salmon.


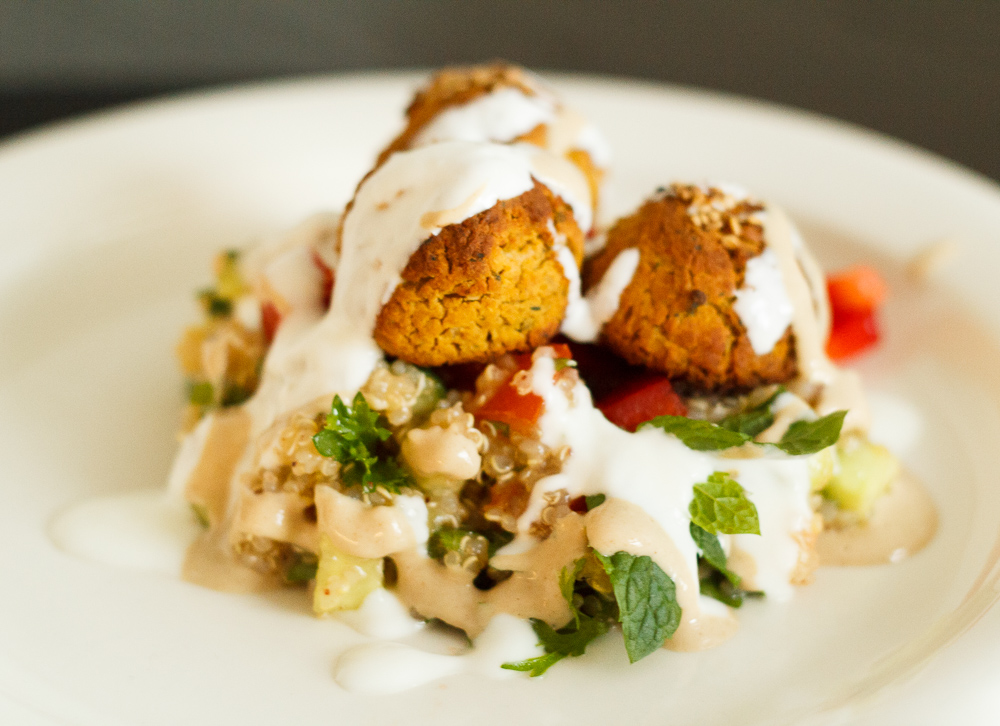
Sweet potato falafels and quinoa tabbouleh


 Dinner is served! I've been almost deliriously happy to be puttering away in my mom's lovely kitchen after my travels. The first week has seen a couple of main dishes, lots of healthy sweet treats and breakfast aweomeness. After the ashram diet I've put on a few kilos already, but boy has it been worth it :D

The Finnish summer decided to play its trump card and drop the temperatures below 10 degrees and accompany the freeze with rain and wind. Thanks! But I don't really mind, Finland is still Finland: the air is clear and clean which makes a change after the dusty Kathmandu and everything is super green and lush after the rains and the wonderful spell of warm summer weather that just conveniently ended before my arrival. Any my mom's excited that she doesn't have to do the cooking, for once!

So, let's get to it, shall we? This time I have a main dish for you. Or actually two, combined into one delicious meal. These recipe is from one of my favourite blogs, Feelgood Kitchen. And even though the blog is in Finnish, fear not, English speakers! I have translated them for you, so that you can enjoy recreating the yumminess, if you so choose.

Without further ado: sweet potato falafels and a fresh, lovely gluten free alternative for the middle eastern staple, tabbouleh. The falafels were a bit on the dry side for my liking, so next time I'd add some more moisture to the mix. The baking time was also a little longish for my oven, so I recommend keeping an eye on the things while they're baking away, so that they don't get even drier or burn. The original recipes for both the falafels and tabbouleh are doubled, and my ratio of sweet potato / chickpea might have also been a bit off, but the falafels were good anyway, especially with the light and fresh tabbouleh.

The tahini sauce might have worked better with a lighter tahini; mine was an organic and quite flavourful. I also can't take quite as much raw garlic as was called for in the recipe and only used one clove. The sauce turned quite pungent, so I took the liberty of softening it a bit with maple syrup. I also served yoghurt as a second sauce, and I think it was a very welcome addition.


Sweet potato falafels

(original recipe here, in Finnish)

makes ca. 20 small falafels


smallish sweet potato (ca. 300-400 g)

1 can chickpeas / 3 dl soaked and cooked ones

1,5 tbsp tahini

2 cloves of garlic

1 onion

0,5 dl chickpea flour

couple of handfuls of fresh coriander

1,5 tsp cumin

0,5 tsp chili powder

a fair amount of salt

black pepper

on the surface: olive olil & sesame seeds


Prepare the sweet potato in the microwave oven: wash it, stab it a couple of times with a fork and wrap in slightly damp kitchen roll. Stick in the microwave on a microwave proof plate, nuke for 3 min. Flip the sweet potato around, nuke another 3 min until soft. If you don't have a microwave, chop the sweetie , drizzle with olive oil and roast in 200 degrees until soft. Let the sweet potato cool down a bit.

Add all inredients (not the chickpea flour!) in a food processor and blend into a doughy paste (it doesn't have to be smooth). You can also use a stand mixer. Check the flavour and add spices, if needed. Mix the chickpea flour to the dough in the end.

Heat the oven till 225 degrees. Roll the dough into small balls with moist hands, set on a baking sheet. Drizzle with olive oil and sprinkle with sesame seeds, if you'd like. Bake for 35 minutes (too much in my oven) or until the falafels are a nice golden colour.


Lemon tahini sauce

1 dl tahini

0,75 dl water

3 tbsp lemon juice

1 tbsp olive oil

1 clove of garlic, crushed

a sprinkle of salt and black pepper to taste


Mix all ingredients. Add water until the consistency is to your liking. The sauce will keep in the fridge for a couple of days.


Quinoa tabbouleh

(original recipe here, in Finnish)

2 dl cooked quinoa 

1/2 small cucumber

2 tomatoes

1/2 bell pepper

a small handful of fresh parsley

a small handful of fresh mint and coriander

0,5 tsp salt

0,25 tsp cinnamon (I added more as I'm a cinnamon junkie)

1,5 tbsp olive oil

1,5 tbsp lemon juice

Dice the veggies and chop the herbs. Let the tomatoes sit on a couple of sheets of kitchen roll for a bit so that they don't make the tabbouleh soggy. Mix quinoa with spices, olive oil and lemon juice. (Pro tip! I like to cook my quinoa with lemon juice and soy sauce/tamari. If you follow my lead, then you can reduce the amount of lemon juice in the recipe. Try what suits your taste buds the best!) Add diced veggies and chopped herbs. Mix and enjoy!

The tabbouleh was even more delicious the next day, as the cinnamon popped up way more then. Super omnom!


Wednesday, 8 June 2016

Transformation and kick-ass granola

So, I'm back from my trip to Asia. The last weeks were mainly spent drooling in various food blogs and thinking about changing the name and language of my blog to better reflect the new me who's behind the screen now. And voilá: from the ashes of Pata ja Kattila, Delicananda was born! Recipes and musings about food in English, experiments in the kitchen, tales of travels and all that jazz. Welcome!

After landing in Finland and getting to my mom's recently redone kitchen I was almost delirious with happines. I get to cook and bake again! Yipypiyippeeee! So, without further ado or adon't, let's get to it. The first thing I made and the first recipe of the new and improved blog I'm sharing with you is... *drumroll, please* A BREAKFAST GRANOLA! The inspiration is from one of my favourite blogs ever, Syötävän hyvä, namely these two posts. I've never made granola myself before, so now was the high time. And it turned out awesome!


The marriage of delicious nuts, seeds and flakes, roasted in the oven into crunchy perfection. Just try it! Plain out of the jar a a snack or sprinkled into your favourite type of yoghurt. These would also work wonders in a chia pudding or a topping for an ice cream. The possibilities are endless!


Crunchy granola


0,5 dl buckwheat flakes

0,5 dl millet flakes (can be subbed with oat/quinoa...)

2 dl nut mix (e.g. cashews, almonds, brazil nuts, pecans...)

0,5 - 1 dl seed mix (I used peeled hemp seeds, sunflower seeds and pumpkin seeds)

3 tbsp coconut oil

2 tbsp maple syrup

1 tbsp cinnamon

1 egg white


Combine the dry ingredients in a bowl. Add wet ingredients and mix until you get an evenly distributed, sticky looking mixture. Spread out on a baking sheet lined with baking paper and roast in 175 degrees for about 20 minutes, or until the nuts have started to get a little colour and the texture is getting crunchier. Mix a couple of times during the roasting. Cool and store in an airtight container. Use in every way imaginable!


Saturday, 30 April 2016

Chunky monkey madness

A person doesn't need a lot to be happy. This ice cream turned so amazing that there was an element of danger in the air as I couldn't help but lick the food processor blades that I used to make this awesomesauce treat. It makes no sense how divine a combination of frozen bananas and cacao powder can be! I wouldn't have needed any sweetener, but as I made the batch to be sold in the cafe I was working, I added some coconut syrup to make the punters happy. And the feedback hasn't been bad, let me tell you. I also testet adding some peanut butter in the mix which naturally didn't make things worse, but it was the normal kind with added sugar (since when living on an island, the pickings are sometime slim), so if you choose to use it, take one without sugar or make your own.

This treat works well as a soft serve, scooped into your mouth straight out of the mixing bowl, or frozen further into an ice-cream. You can also add some texture to the ice cream by adding some chopped nuts, cookie crumble, or whatever you may have on hand.

--------

Ei tartte ihminen paljoa tullakseen onnelliseksi. Tästä jätskistä tuli niin hyvää, että jo oli vaaran hetket käsillä kun en malttanut olla nuolematta monitoimikoneen teriä. Ei mitään järkeä, miten voi suklaan ja banaani kylmä yhdistelmä olla jumalaista. Ite en välttämättä ees tarttis makeutusta, mutta kun tämä meni myyntiin niin laitoin kuitenkin. Ei oo tullut huonoa palautetta, ei. Testailin sekä pähkinävoilla että ei, hyväähän se on siellä seassa mutta jos haluaa vältellä sokeria niin jättäkee pois. Toimii niin pehmiksenä tai oikeammaksi jätskiksi jäädytettynä. Sekaan oon heitellyt ekoissa versioissa kakkucrumblea josta en parin yrityksen jälkeenkään saanut crumblemaista koostumusta, joten ei siitä sen enempää. Sattumia on kiva olla, joten uudemmissa versioissa seassa on ollut siis em. pähkinävoita ja murskattuja pähkinöitä saatavuuden mukaan.


Chunky monkey

6 ripe bananas

5 tbsp cacao powder (unsweetened)

6 tbsp coconut milk

3-4 tbsp peanut butter

sweeten to taste (about 1-2 tbsp honey/coconyt syrup)

chopped nuts/cookie crumble for texture

Chop and freeze bananas. When they are frozen, add all ingredients (except chopped nuts/cookie crumble) in a food processor bowl and buzz till the consistency is smooth. Add sweetener if desired and buzz again. Mix in the chopped nuts/cookie crumble. Eat as soft serve or freeze.

-------

6 kypsää banaania

5 rkl kaakaojauhetta

6 rkl kookosmaitoa

3-4 rkl pähkinävoita

maun mukaan makeutusta (hunajaa/kookossiirappia), laitan yleensä n. 1-2 rkl)

pähkinämurua tai muita sattumia

Paloittele banaanit ja pakasta. Kun ovat kohmeisia, pistä kaikki yhdes koos blenderiin ja surauta pehmikseksi. Jos banaanit ehtii kovin jäisiksi, ne kannattaa lisätä erissä ettei blenderi kauhistu. Makeuta maun mukaan. Sekoita sekaan pähkinämurut. Syö sellaisenaan pehmiksenä tai pakasta jäätelöksi.


Mango-lime raw cake

More "baking" in the paradise! Soooo good, this cake. Except it needs a little more lime, note to self for the next batch. And the mango puree on top isn't necessary, as it is kind of overwhelming to the poor subtle lime flavour. The taste is super fresh and yummy, and the consistency really good (read: doesn't fall apart or melt in the fridge after freezing). Recipe from here with slight modifications.

---------

Lisää paratiisisaarikokkailua, olkaatten hyvät. Ihan sairaan hyvää! Paitsi että ens kerralla vielä lisää limeä. Ja päälle ei välttis tartte kuvassa olevaa mangososetta, se pistää hennon limen hukkumaan vielä enemmän. Mutta niin, sanoinko jo että aivan älyttömän raikasta ja hyvää. Ja pysyy koossa myös jääkaapissa jäädytyksen jälkeen. Resepti täältä hieman modattuna.


Mango, lime and coconut raw cake

Crust

1 cup raw almonds

¾ cup pitted fresh dates (mine were dryish, so ended up using 1,5 cup)


½ cup unsweeneted fine coconut (not available, subbed with oat flakes)


  • ½ tsp lime zest (wanna use more next time)


Cake mass

2 cups cashews, soaked at least 1 hour, drained and rinsed

¼ cup fresh lime juice (more next time)


1 cup fresh mango (used 2 cups to get more flavour)


  • ¼ cup maple syrup (subbed with honey/coconut syrup)

¼ cup coconut oil, melted


¼ cup canned coconut milk


To make the crust, place the almonds, dates, coconut (oat flakes) and lime zest in a food processor and process until it forms a dough.
  1. Press the dough into the bottom of a 20 cm springform pan (or try your luck with a normal pan, like I did).
  2. To make the cake, place the cashews, lime juice, mango, syrup/honey, coconut oil and coconut milk in a food processor and mix well, stopping to scrape down the sides.
  3. Continue to blend until it's very smooth.
  4. Pour into the pan on top of the crust.
  5. Place in the freezer and let set for at least 3 hours.
  6. Let thaw for 10 minutes before slicing and serving.


Vegan gluten free bliss brownies

I'm on Koh Phangan again, yay! And baking for and selling coffee in Art Cafe. These vegan brownies turned out to be a real hit. The recipe is taken from here with slight modifications. Works also well doubled. And baked in about 160 degrees... Can't be sure as the weird magic oven I'm using doesn't have any temperature markings, but the previous owner thought 160 was close to the truth so I believe her.

-------

Koh Phanganilla jälleen! Art Cafessa myynnissä tämän tytön tekemiä supermeheviä browneja. Gluteenitonta ja vegaania hyvyyttä, ah. Resepti täältä, modattu olosuhteisiin sopivaksi. Toimii myös tuplana. Ja n. 160 asteisessa uunissa paistettuna (tarkempaa havaintoa kyseisen taikauunin lämpötilasta ei ole, mutta edellinen omistaja arveli 160 olevan lähellä totuutta).


Ultimate Vegan Gluten free Brownies


3 tablespoons chia seeds + 9 tablespoons water

½ cup extra virgin olive oil (125 milliliters)


2 tablespoons peanut butter


1 cup coconut sugar, or a mixture of coconut sugar and brown sugar (200 grams)


½ cup unsweetened cocoa powder (50 grams)


¼ cup rice flour (40 grams)


¼ cup tapioca starch (potato starch in the original recipe) (40 grams)


¾ cup mixture of oat and buckwheat flour (brown rice flour in the original recipe) (105 grams)


½ cup pecans/cashews (walnuts in the original recipe) (60 grams)

Instructions
  1. Preheat the oven at  180 º C (works also with 160).
  2. Add the chia seeds and the water in a food processor, let sit for 10 min until a jelly forms. Add oil, peanut butter, sugars and blend. 
  3. Combine the dry ingredients in a bowl. Mix well.
  4. Combine the dry and wet ingredients and mix well, or process in food processor. Add then uts and stir.
  5. Pour the mixture in a baking pan with baking paper and bake at 180 º C for about 25 minutes or 160 around 30 mins.