Showing posts with label vegan. Show all posts

Sunday, 2 October 2016

The best gluten free crispy bread


Crispy and crunchy has always had a certain appeal for me. Biting through a tower of wonderful toppings to end up with a satisfying crunch in the end is a fine thing indeed. Here's one of my absolutely favourite crispy bread recipes. It is ridiculously easy to make, and endlessly variable. Just use any (gluten free) flour combination (if you use gram or coconut flour, you might need to add some more liquid), any nut/seed combo and any spices. Did I say endless varieties? It's true!

I don't quite remember where the original recipe came from, but I  do remember it was made with all corn flour. A corny version (see what I did there? ;)) is also super yummy, but like said, experiment and see which flour combination floats your boat.


Delicananda's go-to crispy bread

2 dl gluten free flour 

0,5 dl pumpkin seeds

0,5 dl sesame seeds

0,75 dl sunflower seeds

0,5 dl flax seeds

0,5 dl olive oil

2,5 dl boiling water

1 tsp salt or 0,5 tsp salt and some salt sprinkled on top before baking

spices (I often use turmeric, curry, ginger, cinnamon or chili. Or all of them)


Mix together all dry ingredients. Add oil and boiling water. Mix into a spreadable dough. Pat onto a baking tray lined with baking sheet with your hands (I use gloves for this) or spread with a spoon. Spread into an even and thin layer. Bake in 150-160 degrees for 40-50 min. Cover with aluminum foil in the end if the bread isn't yet crispy but is starting to look a little too brown. Let cool, break into portion sizes and gobble up :)


Friday, 2 September 2016

Fudgy vegan brownies with a secret


I don't think there's a person on this earth who doesn't like brownies. Or if there is (and the reason isn't chocolate or histamin intolerance), there must be something wrong with them. Or well, I don't want to be mean, so I take it back. You're allowed to dislike brownies (and that means there's more for me!) But at least I love and adore them in all shapes and sizes. I'm also very picky when it comes to The Perfect Brownie. Dry baked goods suck and brownies make no exception to the rule. I'm also very interested in using my baked goods to smuggle all sorts of veggies to unsuspecting customers, muahaha.

I have a vaque recollection of doing a beetroot chocolate cake in the "good old" GlutenSugar days, at least I've had it on my agenda for a while. But now I decided to try it as the first treat I made for a wonderful café I've been baking for a bit over a month now, Lykke. They cater for all sorts of special diet people so I'm absolutely thrilled to be able to bake for them and practice my skills without having to eat everything myself.


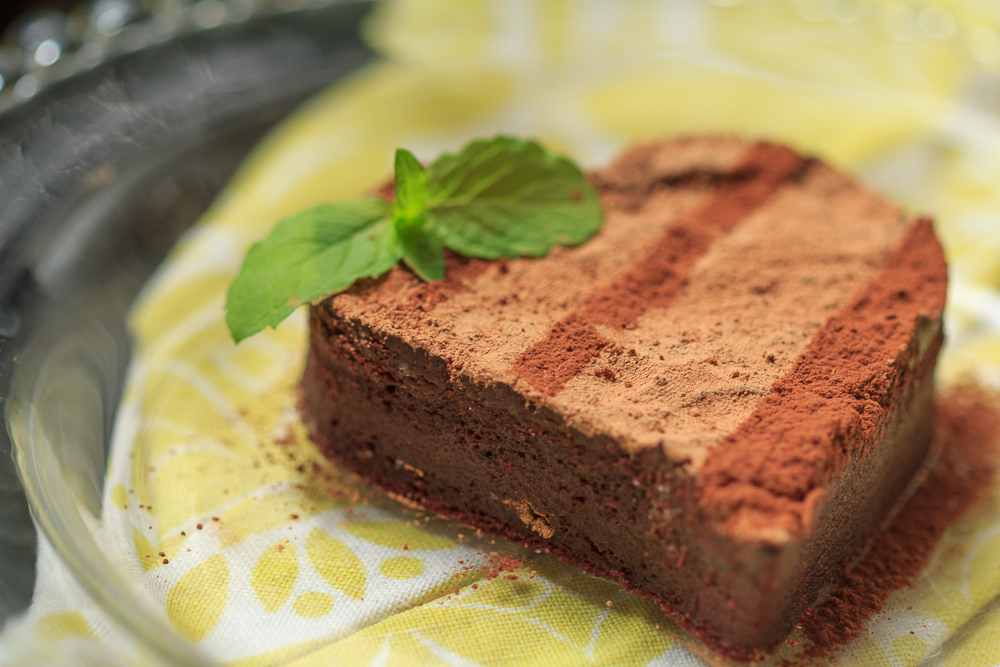
The recipe for these babies is from Unconventional baker, a wonderful blog for us who'd like our cakes without any conventional ingredients but still absolutely yummy. The first batch of the brownies that I fed to my girlfriends was a little too dense and smooth to my liking, plus the taste of beets was a bit too overpowering. And I managed to mess up the topping and it separated... It still tasted good but required a generous dusting with cocoa powder to make things photo worthy.

I changed things around a bit for the café version, replacing the beet boiling water with almond milk and adding chopped almonds into the batter for some texture. The result was much better, and it does say "fudgy brownies", not "fluffy brownies" in the recipe... They are dense, but super mega yummy, and I'll take a dense brownie against a dry one any day. Give them a go!


Fudgy beet brownies


Base

1/2 c wholemeal rice flour

6 tbsp sticky rice flour

1/4 c tapioca flour

1/4 tsp guar gum / xanthan gum

1/2 c cocoa powder

1 tsp cinnamon

1 tsp baking powder

1/2 tsp baking soda

1/4 tsp salt

1 c cooked beet puree

1 c maple syrup/other sweetener

1/2 c almond milk/other non-dairy milk (or beet water)

1 tbsp vanilla

chopped almonds/nuts


Topping

1 c non-dairy chocolate (chips or chopped block chocolate, preferably sugar free)

1/4 c margarine

(salt, if using unsalted margarine)

1/4 c almond milk/other non-dairy milk (or beet water)

(1/2 tsp amond extract, if you can get your hands on it. I couldn't)

cocoa powder for dusting


Heat oven to 175 C. Grease a 20 x 30 cm baking tray (or something roughly similar).

Make the beet puree first: plop beets into a kettle full of water and boil until soft. You can peel them before boiling of after, your call. Puree the boiled peets in a blender. Add a splash of beet boiling water to help things along, but don't thin out the puree too much, it needs to be nice and thick.

Mix flour, cocoa powder, baking soda, baking powder, cinnamon, and salt in a large mixing bowl. Add in all remaining base ingredients except chopped almonds and mix everything with a mixer to combine. Fold in chopped almonds. Pour into prepared baking pan and level the top with a spatula to smooth out the batter.

Bake for approximately 25 minutes until a skewer inserted in the center comes out dry(ish). Remove from oven and place on a cooling rack for 10 minutes.

In the meantime, prepare the chocolate topping by placing all ingredients in a glass or stainless steel bowl. Warm the mixture carefully on a double boiler and mix occasionally until everything is smooth and uniform. Once the brownie base has cooled a little, pour this mixture thinly and evenly over the brownies (use a spatula to spread it around evenly as needed). Allow the brownies to chill a little by placing them in the fridge for at least 20 minutes, once the tray has cooled enough to go in the fridge. This will allow the topping to get absorbed into the brownies, and that's when the magic happens.

Dust with some cocoa powder, cut into squares or hearts or dinosaurs or or or... and dig in :)

I knew I'd find a use to the dusting stencil I bought from Ikea way back when!


Zucchini noodle avocado sauce mush


Yes yes, I know. This dish has become such a cliché in food blogs, but since I don't give a damn about such things (plus I want to jot it down before it gets lost in the sea of recipes I have bookmarked), here goes.

I love love love zucchini spaghetti and finally decided to "splurge" and get a gadget for making the said delicacy. I had a julienne peeler before but was never really satisfied with the quality of the strips it produced, they were too thin for my liking. This new baby which cost all of 12 euros if I remember correctly delivers! No, it's not a spiralizer, but it takes much less space in my teeny tiny kitchen and the price was a definite bonus.


And it produces the cutest cones ever! Awww...

I found the recipe in Paleo Cupboard and the result was just absolutely amazingly scrumptious. The avocado sauce had exactly the right amount of flavour, although I think I used a little less garlic than the recipe, since I'm still getting used to it again after omitting it from my diet for quite a while due to sensitivities. But feel free to use all 3 cloves if you want yours more garlicky. You can either serve the noodles raw or cook them. I love them both ways but this time I cooked them and the result was really really good. So, anyway you go, you can't go wrong.

The pics also don't really do this dish justice. I wringed my poor zucchinis to within an inch of their lives while  trying to get the excess liquid out and didn't believe the recipe when it called for 6 large zucchinis, so the result is more a mush under a mush than noodles with a sauce. But hey, I'm always of the opinion that there can never be too much sauce and am known to drown all sorts of innocent cakes in something liquid and sweet, so I had no complaints. If you want a more photogenic dish, do as I say, not as I do. Yes? :) But now: Let me present: Miss Avocado meets Mr Zucchini, falls in love and decides it never wants to be separated from him ever again, aka Mush. Enjoy!


Zucchini noodles with avocado cream sauce


6 large zucchinis (yes it seems like a lot but they lose a lot of volume when squeezed)

1/2 tsp sea salt

1 tbsp oil


Sauce 

2 large avocados, peeled and pitted

1/4 cup packed basil leaves

1/2 tsp sea salt

1/2 tsp black pepper

3 cloves of garlic, minced (or less, I think I had 2 small ones)

2 tbsp olive oil

1 tbsp lemon juice


Julienne or spiral slice your zucchini and place in a strainer over a larger bowl or in the sink. Sprinkle about 1/2 teaspoon of salt over the zucchini and toss to coat. Allow the zucchini to sit for 15-20 minutes to allow excess liquid to drain. After the zucchini has drained, wrap it in a few paper towels and squeeze gently (don't wring it to death) to remove any remaining moisture. Wrap again in fresh paper towels and leave on the counter until ready to cook.

To make the sauce, place all of the sauce ingredients in a blender or a food processor and blend until smooth. Taste and add additional salt and pepper if desired. 

Note: If serving raw, stop here and serve the sauce on top of the noodles.

To cook the noodles, pour oil in a large skillet and warm over medium-high heat. Add the zucchini and cook for 2 minutes. Add the sauce and toss with the noodles to coat. Cook for another 2-3 minutes or until heated through, then serve.


Saturday, 23 July 2016

Sweet potato boats with delicious cargo


So, I have a confession to make: sometimes I cheat on coconut with the other love of my life, sweet potato. Give me fries, wedges, brownies, mash - anything goes, as long as it's orange. This dish is a true ode to that wonderful root vegetable. It is again from Outi Rinne's wonderful book Mieliruoka and cooked to (almost) perfection in my mom's kitchen. The boats carry a truly nutrious cargo of quinoa, black beans, tomatoes in two forms and a wonderful array of spices. Absolutely delicious!

I roasted way too much of the sweet potatoes, so the rest of them I mushed and smuggled into a batch of cookies I promise to share with you later. Watch this space! :) And really, there's no such a thing as too much sweet potato. You can put it anywhere: bake into bread rolls, make brownies or cookies, just eat it as is, make veggie patties, paint the walls with it, marry it... The choices are endless. Or if in doubt, just ship it over to me and I'll make short work of it ;)

I also put a little too much of the sundried tomatoes in, since I thought the "6" that's called for in the recipe means 6 whole tomatoes, and my sundrieds were halves. But I think 6 halves would have been more than enough since they do lend a very "dark" and pungent-y sour taste to the filling.  

These babies are really yummy by themselves, but once again, like in the lentil watermelon salad, the mint vinaigrette makes a real change. Sooo fresh and yummy! Also a nice salad would be great as a side dish, if you want to have more greens with your orange. 


Sweet potato boats


2 small plump or 4 skinnier sweet potatoes

coconut or sesame oil


Filling

1 dl quinoa

1 tin (285 g) black beans

6 sundried tomatoes

2 fresh tomatoes, chopped

1/2 onion, grated

1 clove of garlic

grated zest and juice of 1/2 organic lemon/lime

1 tsp cumin

1 tsp oregano

1/2 tsp coriander powder

black pepper to taste

1/2-1 tsp salt

3 tbsp cacao nibs (I didn't have these so left them out)

1 tsp smoked bell pepper powder (mom can't deal with bell peppers so left this out)

2 dl soft innards of sweet potatoes 

For garnishing: fresh coriander


Heat the oven to 200 degrees. Scrub the sweet potatoes clean under flowing tap water. Split in four wedges lengthwise (or in 2 wedges if the sweet potatoes are very skinny). Give the wedges a nice oil massage and roast in the oven for about 30 min or until they are soft and done.

Meawhile: prepare the filling. Cook quinoa according to the directions in the package. Grate lemon/lime zest, garlic and onion in a large bowl. Grate also the fresh tomatoes (best to halve the tomatoes and grate with the cut surface facing the grater). Pat the excess oil out of the sundried tomatoes with kitchen roll and chop the tomatoes, add into the bowl. When the quinoa has cooked, drain it well and add 2 dl in the bowl. If there's something left over, save it for other use. Add the remaining filling ingredients in the bowl (not the lemon juice or the sweet potato meat, since it's still in the  oven (d'oh!)). Mix.

Take the soft and lovely sweet potatoes out of the oven. Scrape the innards out of the boats carefully, so that there will be a hole where you can put the filling. I didn't manage to do this very well and we ended up having just filling on sweet potato skins, mainly :P. Equally delicious but not as pretty. Add the scraped out sweet potato innards/meat/flesh or whatever it's called (2 dl or more of it) into the bowl. Check the flavour and add lemon/lime juice if needed. Spoon the filling into the awaiting boats and finish with fresh coriander.

Serve with mint vinaigrette. Devour.


Sunday, 12 June 2016

Chickpea choc chip cookies


I think you were promised a sweet treat. Well, wait no longer, my sweet-toothed little munchkins. Here's something for you that's sweet and good for you at the same time!

Chick peas (or garbanzo beans) are one of my favourite legume sorts. You can roast them, mush them, mangle them or do whatever, and they still don't complain and taste delish. You can apparently also magic sweet treats out of them, like this recipe proves. Verily amazing!

My version tasted quite orangey, since I used an orange dark chocolate. I imagine these would be equally good with a plain one. Or a mint one? Yum!

And yeah, they are vegan. Not that they need to be, for my kitchen, but hey, if that's the way you roll, then these are complete good for you, too! Inspiration this time was the lovely Detoxinista. Hey, already in English! Whaddayaknow. Less translation needed.


Chickpea chocolate chip cookies

(original recipe here)

makes 16 cookies


1 1/2 cups cooked chickpeas

1/2 cup gluten free oat flour

3/4 cup coconut sugar

3 tbsp melted coconut oil

1 tbsp vanilla extract (or vanilla powder)

1/2 tsp salt

1/2 tsp baking soda

1 tsp apple cider vinegar

3/4 cup dark chocolate chips

*Note: You can make your own flour by simply grinding gluten-free rolled oats in a food processor or coffee grinder until a fine flour is created. 
Preheat the oven to 175 degrees and line a baking sheet with parchment paper. Process the chickpeas, coconut oil and vanilla in a food processor until relatively smooth. You can also use a stand mixer. Add in the coconut sugar, flour, salt, baking soda and vinegar and blend or mix until until a smooth batter is formed. Or not so smooth, if you're using a rather low-power stand mixer like me. You might need to add more oil in that case. I did.

Add in the chocolate chips and pulse/mix briefly. Drop the dough by heaping tablespoons onto a lined baking sheet and use wet fingers to gently flatten the cookies (they won’t spread on their own.) Bake until the tops begin to crack and the edges are dry to the touch, about 18 to 20 minutes. Cool completely (or as long as you can wait) on a rack before serving.


Saturday, 30 April 2016

Vegan gluten free bliss brownies

I'm on Koh Phangan again, yay! And baking for and selling coffee in Art Cafe. These vegan brownies turned out to be a real hit. The recipe is taken from here with slight modifications. Works also well doubled. And baked in about 160 degrees... Can't be sure as the weird magic oven I'm using doesn't have any temperature markings, but the previous owner thought 160 was close to the truth so I believe her.

-------

Koh Phanganilla jälleen! Art Cafessa myynnissä tämän tytön tekemiä supermeheviä browneja. Gluteenitonta ja vegaania hyvyyttä, ah. Resepti täältä, modattu olosuhteisiin sopivaksi. Toimii myös tuplana. Ja n. 160 asteisessa uunissa paistettuna (tarkempaa havaintoa kyseisen taikauunin lämpötilasta ei ole, mutta edellinen omistaja arveli 160 olevan lähellä totuutta).


Ultimate Vegan Gluten free Brownies


3 tablespoons chia seeds + 9 tablespoons water

½ cup extra virgin olive oil (125 milliliters)


2 tablespoons peanut butter


1 cup coconut sugar, or a mixture of coconut sugar and brown sugar (200 grams)


½ cup unsweetened cocoa powder (50 grams)


¼ cup rice flour (40 grams)


¼ cup tapioca starch (potato starch in the original recipe) (40 grams)


¾ cup mixture of oat and buckwheat flour (brown rice flour in the original recipe) (105 grams)


½ cup pecans/cashews (walnuts in the original recipe) (60 grams)

Instructions
  1. Preheat the oven at  180 º C (works also with 160).
  2. Add the chia seeds and the water in a food processor, let sit for 10 min until a jelly forms. Add oil, peanut butter, sugars and blend. 
  3. Combine the dry ingredients in a bowl. Mix well.
  4. Combine the dry and wet ingredients and mix well, or process in food processor. Add then uts and stir.
  5. Pour the mixture in a baking pan with baking paper and bake at 180 º C for about 25 minutes or 160 around 30 mins.